
|
Windows preinstallation for RATT |

|
IMPORTANT: Sorry, but due to memory limitations in cygwin of 1GB, RATT won't run for each genome. We would so far rather advice users to use the linux version.
1. Download the cygwin installer from the cygwin website (www.cygwin.com).
2. You may be given a security warning like figure 1. If so, click run.
Figure 1:

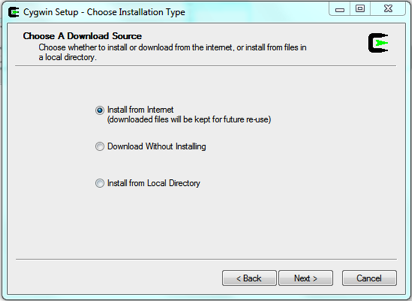
3. Click next to be taken to the dialogue box shown in figure 2, select install from internet and click next.
Figure 2:
4. The next screen (Figure 3) will allow you to change the root directory used by cygwin, we don’t recommend you change this, especially if you do not know what a root directory is. If you can it is best to install for all users here, but don’t worry if that isn’t possible other users will still be able to access cygwin if they launch it directly from the installation directory. Click next.
Figure 3:

5. The next screen sets the download location (you can clean this up once the install is finished). Set whatever directory is most convenient for you, just remember where so you can tidy up later. Click next.
6. The next screen asks how you connect to the internet. This is likely to be the first option “Direct Connection” so select that, in the event it doesn’t work select “IE5 settings” or contact your systems administrator for proxy details. Click next.
7. You should be taken to a screen where you can set a download site, any site will work but you may find the download is quicker if you choose a site closer to where you work. E.g. in Europe select .de (German) or .fr (French) sites or in North America .edu (US) or .ca (Canadian) sites may perform better. Click next.
8. You should now be presented with the package selection screen.
9. First install make by typing “make” in the search box (Figure 4)
a. Expand the Devel tree by clicking on the “+” sign
b. Under the column “new”, click to change “Skip” to a version number for “make: The GNU version of the ‘make’ utility” (This sets the individual packages to install).
Figure 4:

10. Install g++ by typing “g++” in the search box (figure 5)
a. Expand the Devel tree by clicking on the “+” sign
b. Under the column “new”, click to change “Skip” to a version number for gcc-g++: C++ compiler” (This sets the individual packages to install).
Figure 5:

11. Install C shell by typing “tcsh” in the search box (figure 6)
a. Expand the Shell tree by clicking on the “+” sign
b. Under the column “new”, click to change “Skip” to a version number for the tcsh entry (there will only be one).
Figure 6:
12. Install Subversion by typing “Subversion” in the search box (figure 7)
a. Expand the Devel tree by clicking on the “+” sign
b. Under the column “new”, click to change “Skip” to a version number for “Subversion: A version control system” and “Subversion-perl: A version control system (perl bindings)” under Devel (This sets the individual packages to install).
Figure 7:

13. Install Perl by typing “perl” in the search box (Figure 8)
a. Click on the Perl entry to change “Skip” to “install” (This installs the whole tree).
Figure 8:

14. Click next, confirm any additional packages by clicking next again and cygwin will begin installing. This will take a while.
15. Once everything is installed you will be taken to the final installation screen and asked if you would like to create start menu icons and desktop short cuts, at the very least we’d recommend a start menu icon so you can launch cygwin without hunting around your hard drive. Click finished.
16. Cygwin is now ready and installed: click your desktop icon if you created one, or Cygwin Bash Shell in the start menu, to launch.
17. Install perl modules starting with Data::Stag by typing in: PERL_MM_USE_DEFAULT=1 perl -MCPAN -e 'force install Data::Stag'
18. Then install Bio::SeqIO: PERL_MM_USE_DEFAULT=1 perl -MCPAN -e 'force install Bio::SeqIO'
19. At this point you can follow the instructions given for Linux/OS X to finish RATT installation.